Table & Layout - 表格与表格布局
目前,我们的 UI元素(Element) 还只能在一行摆放,如果希望实现换行,调整元素大小、间距,我们就必须引入一些专门用于 布局(Layout) 的元素。
在 Mindustry 的UI引擎里,最常用的布局元素就是 表格(Table),相对应的布局方式就是 表格布局(Table Layout)。
Table - 初识表格
- 我们先修改一下代码,给页面添加一个表格,再把图片元素放到表格内:
Events.on(ClientLoadEvent, (e) => {
  const dialog = new BaseDialog("My First Page")
  dialog.cont.add("Welcome to my first page!")
  dialog.cont.add("Mono is mining")
  dialog.cont.image(Items.copper.uiIcon)

  dialog.cont.image(UnitTypes.flare.uiIcon)
  dialog.cont.image(Blocks.duo.uiIcon)
  dialog.cont.image(Liquids.water.uiIcon)
  dialog.cont.image(Icon.upload)
  dialog.cont.image(Icon.cancel)

  dialog.cont.table(null, (table) => {
    table.image(UnitTypes.flare.uiIcon)
    table.image(Blocks.duo.uiIcon)
    table.image(Liquids.water.uiIcon)
    table.image(Icon.upload)
    table.image(Icon.cancel)
  })

  dialog.addCloseButton()
  dialog.show()
})
页面上的图标间距变紧凑了,而且似乎没有其他变化。


- 那么继续修改代码,把间距加回来:
Events.on(ClientLoadEvent, (e) => {
const dialog = new BaseDialog("My First Page")
dialog.cont.add("Welcome to my first page!")
dialog.cont.add("Mono is mining")
dialog.cont.image(Items.copper.uiIcon)
dialog.cont.table(null, (table) => {
table.image(UnitTypes.flare.uiIcon).pad(4)
table.image(Blocks.duo.uiIcon).pad(4)
table.image(Liquids.water.uiIcon).pad(4)
table.image(Icon.upload).pad(4)
table.image(Icon.cancel).pad(4)
})
现在,页面上图标间的间距就回来了。

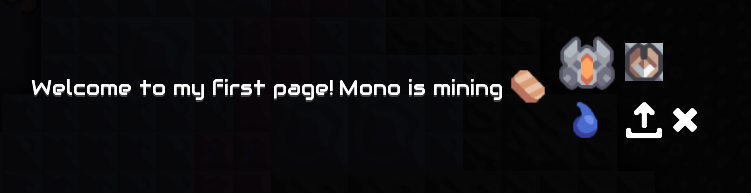
- 继续修改代码,让表格在水的图标的前面换行:
Events.on(ClientLoadEvent, (e) => {
  const dialog = new BaseDialog("My First Page")
  dialog.cont.add("Welcome to my first page!")
  dialog.cont.add("Mono is mining")
  dialog.cont.image(Items.copper.uiIcon)

  dialog.cont.table(null, (table) => {
    table.image(UnitTypes.flare.uiIcon).pad(4)
    table.image(Blocks.duo.uiIcon).pad(4)
    table.row()
    table.image(Liquids.water.uiIcon).pad(4)
    table.image(Icon.upload).pad(4)
    table.image(Icon.cancel).pad(4)
  })

  dialog.addCloseButton()
  dialog.show()
})
- 只有图标还是有些单调,我们给表格加一些文字:
Events.on(ClientLoadEvent, (e) => {
  const dialog = new BaseDialog("My First Page")
  dialog.cont.add("Welcome to my first page!")
  dialog.cont.add("Mono is mining")
  dialog.cont.image(Items.copper.uiIcon)

  dialog.cont.table(null, (table) => {
    table.add("星辉和双管炮:")
    table.image(UnitTypes.flare.uiIcon).pad(4)
    table.image(Blocks.duo.uiIcon).pad(4)
    table.row()
    table.add("水和图标:")
    table.image(Liquids.water.uiIcon).pad(4)
    table.image(Icon.upload).pad(4)
    table.image(Icon.cancel).pad(4)
  })

  dialog.addCloseButton()
  dialog.show()
})
现在文本 星辉和双管炮: 和 水和图标: 在同一列(Column) 并且 居中对齐(Center Alignment)。图标也各自居中对齐。
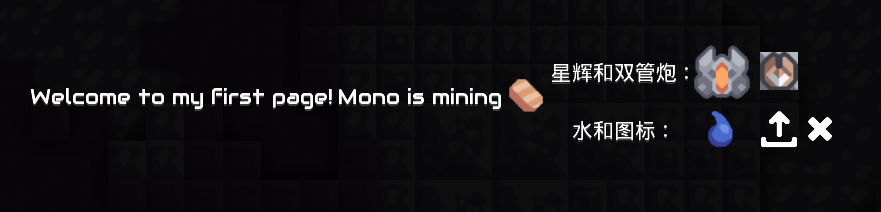
经过上面的探索,你会发现表格添加文本和图片的方式,和之前在页面上添加文本和图片的方式完全一致。这是因为,
dialog.cont其实就是一个 表格(Table)。而且你可以看到,我们通过
dialog.cont.table(...)向页面添加表格,dialog.cont本身也是个表格,这就说明,表格是可以嵌套的——这是表格布局的基础。现在你对 表格(Table) 应该有了一定的理解,不过同样有些代码没有做解释:
- 为什么在添加表格的时候,第一个参数是
null,这是必须的吗?
这不是必须的。
如果你省去 null:
dialog.cont.table((table) => {})你会发现游戏会报错:
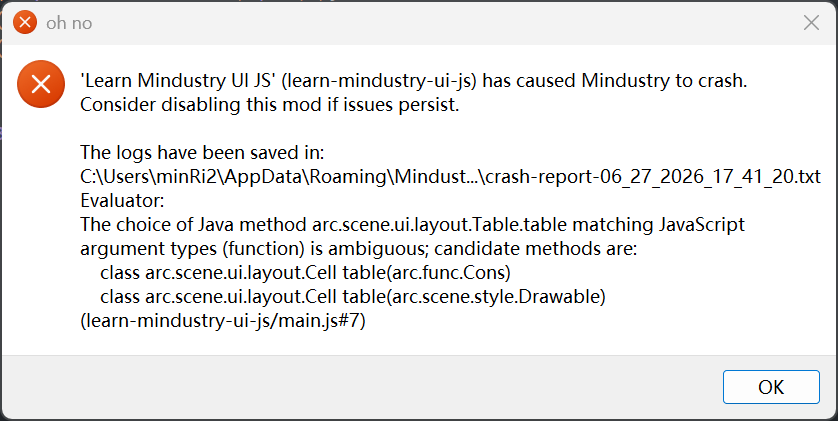
这是因为添加表格元素的函数有很多种,而它们的参数类型各不相同。JS 引擎会尝试根据你传入的类型,去匹配同名函数,上面的写法第一个参数类型是Function,引擎无法根据 Function 区分开 table(Cons) 和 table(Drawable) 函数。如果要写成单参数,正确的写法如下:
dialog.cont.table(cons((table) => {}))但这种写法会显得很啰嗦,而且容易漏掉一对小括号,或者漏掉大括号,不推荐。
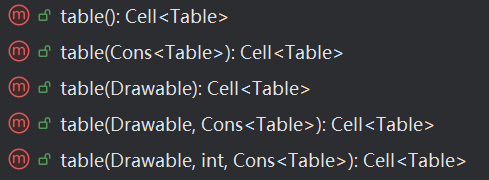
table.add和table.image函数的返回值是什么,为什么调用返回值pad函数就能调整边距?- 这将在下一章 表格布局(Table Layout) 里深入讲解。
Table Layout - 表格布局
接下来我们将专注表格元素,先把其他UI元素删除:
Events.on(ClientLoadEvent, (e) => {
  const dialog = new BaseDialog("My First Page")
  dialog.cont.add("Welcome to my first page!")
  dialog.cont.add("Mono is mining")
  dialog.cont.image(Items.copper.uiIcon)

  dialog.cont.table((table) => {
    table.add("星辉和双管炮:")
    table.image(UnitTypes.flare.uiIcon).pad(4)
    table.image(Blocks.duo.uiIcon).pad(4)
    table.row()
    table.add("水和图标:")
    table.image(Liquids.water.uiIcon).pad(4)
    table.image(Icon.upload).pad(4)
    table.image(Icon.cancel).pad(4)
  })

  dialog.addCloseButton()
  dialog.show()
})
Cell 单元格及其参数
为了能让表格布局更加直观,本教程提供了一个用于可视化表格布局的工具函数,你可以在 相关资源 里找到这个函数,下面,我们先加上部分可视化:
Events.on(ClientLoadEvent, (e) => {
const dialog = new BaseDialog("My First Page")
dialog.cont.table((table) => {
table.add("星辉和双管炮:")
table.image(UnitTypes.flare.uiIcon).pad(4)
table.image(Blocks.duo.uiIcon).pad(4)
table.row()
table.add("水和图标:")
table.image(Liquids.water.uiIcon).pad(4)
table.image(Icon.upload).pad(4)
table.image(Icon.cancel).pad(4)
下面是打开游戏的效果图,展示了表格的布局情况:
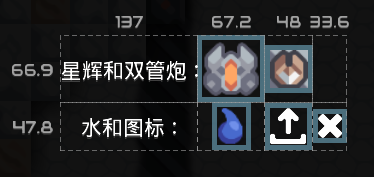
可以看到,表格布局就是将表格这个矩形,横向和纵向划分成若干个区块,而且每个区块内都只有一个元素,这个区块正是一个重要概念:单元格(Cell)。
我们调用 table.image table.add 函数的时候,它们的返回值都是单元格(Cell)。Cell 有很多布局参数,以下是它们的介绍:
minWidthmaxWidth:宽度、最小宽度、最大宽度minHeightmaxHeight:高度、最小高度、最大高度expandXexpandY:单元格是否向X、Y占领空闲区域(空闲区域的概念先按住不表)colspan:单元格占据的列宽(相当于“合并单元格”)uniformXuniformY:是否与行或列统一长或宽pad: 内边距
上图的蓝色部分正是单元格的 内边距(Pad)。
修改单元格参数
- 接下来,我们继续修改代码,让你体会一下单元格参数的修改:
- 给第一行第一列的
星辉和双管炮:单元格的宽高调整为 200、100 - 让
双管炮图标占据两列,即调整 colspan 为 2 - 增大
水图标的内边距,调为16
Events.on(ClientLoadEvent, (e) => {
  const dialog = new BaseDialog("My First Page")

  dialog.cont.table(null, (table) => {
    table.add("星辉和双管炮:")
    table.add("星辉和双管炮:").width(200).height(100)
    table.image(UnitTypes.flare.uiIcon).pad(4)
    table.image(Blocks.duo.uiIcon).pad(4)
    table.image(Blocks.duo.uiIcon).pad(4).colspan(2)
    table.row()
    table.add("水和图标:")
    table.image(Liquids.water.uiIcon)
    table.image(Liquids.water.uiIcon).pad(16)
    table.image(Icon.upload).pad(4)
    table.image(Icon.cancel).pad(4)

    mountDebugElement(table, {
      drawCellBounds: true,
      drawPadding: true,
    })
  })

  dialog.addCloseButton()
  dialog.show()
})- 接下来看看游戏内的效果图的前后对比:
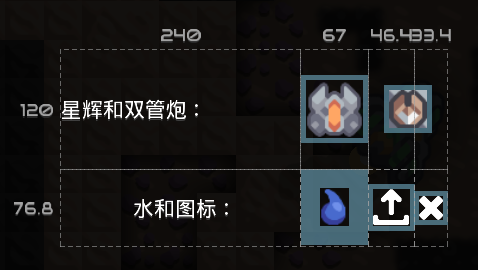
- 我们调整了第一行的行高为100、第一列的列宽为200,游戏内实际的尺寸却是120x240,这与游戏设置的 UI缩放 有关,本教程的UI缩放为120%,实际尺寸也就是所填值的120%。
如果你得到的尺寸和教程所得的尺寸不同,也不用特意去调整 UI缩放,因为教程里的整体布局情况不受UI缩放的影响。
双管炮图标占据了两列,并且图标居中。水图标的内边距扩大了(蓝色区域),把第二行的行高撑大了。此外,你可能还注意到,调整参数时,我们把函数的调用串了起来:
table.add().width().height(),也就是说我们在调用add函数后,又能够继续调用widthheight函数。这是因为
add函数返回 Cell,Cell 的widthheight函数都返回它本身,这样就能实现函数的链式调用了。等效的代码如下:jsconst cell = table.add("星辉和双管炮:") const cell2 = cell.width(200) const cell3 = cell2.height(100) // 其中 cell 、cell2、cell3 都指向同一个对象
下面是所用函数的解释:
width(float)函数的作用是把参数minWidthmaxWidth设置成了该值,height函数也同理。pad(float)函数是同时调整上、左、下、右的内边距。此外,padTop(float)padLeft(float)padBottom(float)padRight(float)可以分别调整上、左、下、右的内边距,而pad(float, float, float, float)也可以单独调整上、左、下、右的内边距。
现在你应该对单元格参数 minWidth maxWidth minHeight maxHeight colspan pad 有了一定的理解,其他参数将在后续教程里涉及。
单元格内的元素布局
先回到开始的代码,添加一个元素边界的可视化:
Events.on(ClientLoadEvent, (e) => {
const dialog = new BaseDialog("My First Page")
dialog.cont.table(null, (table) => {
table.add("星辉和双管炮:")
table.image(UnitTypes.flare.uiIcon).pad(4)
table.image(Blocks.duo.uiIcon).pad(4)
table.row()
table.add("水和图标:")
table.image(Liquids.water.uiIcon).pad(4)
table.image(Icon.upload).pad(4)
table.image(Icon.cancel).pad(4)
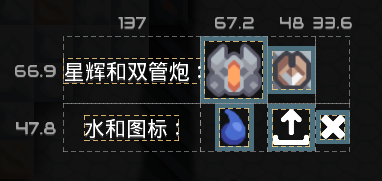
将表格划分成单元格后,表格就会根据单元格参数,为每一个UI元素分配大小和位置,下图额外展示了每个元素的边界。你可以看到,每个元素的边界不一定充满每个单元格,而且位置默认是单元格居中。
单元格(Cell) 还有一些参数用于调整元素在单元格内的布局信息,以下是部分参数及其介绍:
fillXfillY:元素是否在X、Y方向填充align: 元素在单元格内的对齐方式
修改单元格内的元素布局
接下来,我们将继续修改代码,让你体会单元格内的元素布局:
- 让文字
星辉和双管炮:和水和图标:在单元格内左对齐 - 让
双管炮图标和x图标在垂直方向(Y轴)填充单元格 - 让
水图标在水平方向(X轴)填充单元格
Events.on(ClientLoadEvent, (e) => {
const dialog = new BaseDialog("My First Page")
dialog.cont.table(null, (table) => {
table.add("星辉和双管炮:")
table.add("星辉和双管炮:").left()
table.image(UnitTypes.flare.uiIcon).pad(4)
table.image(Blocks.duo.uiIcon).pad(4)
table.image(Blocks.duo.uiIcon).pad(4).fillY()
table.row()
table.add("水和图标:")
table.image(Liquids.water.uiIcon).pad(4)
table.add("水和图标:").left()
table.image(Liquids.water.uiIcon).pad(4).fillX()
table.image(Icon.upload).pad(4)
table.image(Icon.cancel).pad(4)
table.image(Icon.cancel).pad(4).fillY()
游戏内效果图:
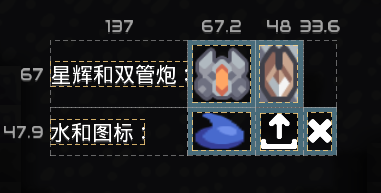
这样,就实现了文字在单元格内左对齐,图片元素也在X或Y方向上填充,而且图片内容也被拉伸了。
下面是所用函数的解释:
Cell.fillX()Cell.fillY()分别调整了fillXfillY参数。Cell.left()函数调整了align参数。此外,Cell.right()Cell.top()Cell.bottom()也可以调整align参数,你可以自己尝试一番。
表格布局的实战练习
施工中...
小结
现在,你应该对表格布局有了大概的理解:代码添加元素、描述何时换行、调整单元格的参数,表格按照代码的描述去划分单元格,根据单元格参数去分配每个元素的位置和大小。这样就完成了从代码到表格布局的过程。